
Don't you just love a
quilt design where there are no rules! I hadn't come across ticker tape quilts until recently and I can't believe what fun they are to make. They are a great way to use up small strips of fabric from your stash and I'm sure that they were orginally intended for strips only - hence the ticker tape name. But in fact they have now become a great way to use up all scraps of any size or shape.
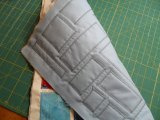
The ticker tape quilt block is intended for quilt as you go methods, so the starting point is a layer of backing fabric with right side down, batting and then white fabric on top with right side up. I chose a 12.1/2" block to give 12" finished size. Pin the three layers.
When placing the patches I tend to start in a corner and work across and down, but there really aren't any rules to this quilt design! Decide on the first patch, lay it where you want to start and sew it down. There are obviously alternative methods of sewing it down. I prefer to zigzag around the patch with a fairly close zigzag - about 1 for stitch length and about 3 for stitch width. I've seen ticker tape quilts where the patches are sewn with straight stitch just inside the edge so that there will be a frayed effect after the quilt has been washed and other quilts where the patches are cut using pinking shears to prevent fraying. I just find that zigzag stitching works for me.

Keep adding patches, sewing each one in place before you move on. Leave a good 1/2" or so around the edge for sewing the blocks together. The patches don't have to be squares or rectangles. Leave enough white fabric showing between the patches, somewhere around 1/4" but that can vary. The main focus of these ticker tape quilts is keeping it irregular, so it's good to vary the amount of white showing and try not to have rows and columns - just varied sizes.
As you can see, the quilting is all done as you go, with plenty of varied shapes of zigzag. I found that as the shapes were so small I could use my normal sewing foot without having to worry about the fabric puckering.
I tried something completely different for the next ticker tape quilt block. I began with a circle in the middle, sewn on in the same way, and used the same fabric for four spokes along the diagonals. Then I filled in the areas between the spokes with random patches and ended up with quite a striking quilt block.

To sew the blocks together I placed them with right sides together and sewed the top fabrics together, then trimmed the batting to lie flat between the blocks, turned under a small hem in one of the backing fabric edges and sewed it down over the other backing fabric.

I stopped after just the two ticker tape quilt blocks and added quilt binding once I had sewn the blocks together. I'm not sure now where I'll put it, but I really love how bright and cheerful it looks.
Thanks for visiting my blog.
I hope to see you again soon.
Rose


2 comments:
I've seen ticker tape quilts before, and never really understood how they are made. From your description, the smaller coloured pieces of fabric are basically appliquéd on to the main fabric, wadding and backing all at the same time, have I got that right? If so, it's the simplest explanation that I've seen and now I might actually be able to make one for myself.
Thanks
Claire from HandmadebyClaireBear
Yes, that's exactly right. So simple, isn't it!
Post a Comment